
I'm so excited to have Tam from Sew Dang Cute here today guest posting with a FABULOUS tutorial using her Silhouette machine. Many of you crafters out there sing the praises of the Silhouette so often and now that I've seen the amazing work it can do, I might just have to go buy one of these myself! I know it's a bit late for this Valentines, but save it, bookmark it, pin it....
it will be wonderful to get a head start on next Valentine's Day!
it will be wonderful to get a head start on next Valentine's Day!
Here's Tam....
________________________________
HI Everyone! It's Tam here from Sew Dang Cute! Recently I received an email from Erica. She is a school teacher and wanted to use the Amanda's Parties To Go's FREEBIE Valentines Tic Tac Toe board in her class.


The only problem is she didn’t want to cut out 28 of these with scissors.
She wondered if there was any way to use the Silhouette for this job!

Yup, you can!

STEP ONE: After downloading the pdf file, convert all the pages to jpeg files as explained in this tutorial HERE. For the purposes of this tutorial, I am only going to show the first page of the download (the Tic-Tac-Toe page), but it’s the same technique for the cupcake topper and wrappers as well.
STEP TWO: Open your jpeg file in Adobe PhotoShop. I had to use PhotoShop to get this particular printable to work.

When I tried just opening it in Silhouette and tracing, the best I could get was this.
Maybe it’s all the different colors or the polka dots, but I just couldn’t get the entire image selected.
So I turned to PhotoShop.
First we need to make the image editable. See in your layers palette at the bottom right. There is only one layer and it is called Background. Notice the picture of the lock next to it. That means we can’t edit the background, which we need to.

So double click “Background” and it will bring up a box that lets you change the name of the layer. I just left mine “Layer 0” and hit ok. Now the lock is gone and we can edit that layer.

STEP THREE: With the magic wand tool (shortcut keyboard command “W”), select all the white space in the page. I only had to click once and it selected all the white. You’ll be able to tell if it’s all selected if it looks like this.

Hit your delete button on the keyboard. It should delete all that white space, then hit Ctrl+D to deselect everything (get rid of the dotted lines).

STEP FOUR: Let’s black everything out. Create a new layer. You can do this a couple of ways, but each way has the same result.
1. Go to Layer in your menu bar, then new, then layer (Shift + Ctrl +N).

2. In your layers palette, click the new layer button (the paper with a corner curled up).

Make sure your forefront color is black and select your paint bucket tool.
Make sure your new layer is selected in your layers palette, then click anywhere on your image and it will paint that entire layer black.

STEP FIVE: Merge layers. Make sure your Move Tool is selected (the main arrow button at the top of the toolbar – keyboard shortcut V). In your layers palette, click on the line right between the two layers while holding down the Alt key. It will change your mouse arrow to a weird little circle with a side arrow.
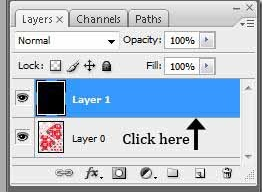
It will also merge your layers. See how Layer 1 is pointing down to Layer 0?

So now your picture looks like this.

STEP SIX: Save your picture as a jpeg file. You can now open it in Silhouette and trace it to get all the cut lines. Refer to the post HERE for tracing instructions. I had to really increase my high pass filter to get the hearts completely yellow.

Go ahead and click trace. Select the black shape and delete it so just the trace lines are showing.

Go ahead and copy (Ctrl + C), then open up the Valentine’s Tic-Tac-Toe page, and paste (Ctrl +V). Move the cut lines over the image.

STEP SEVEN: Now you are ready to print and cut. Refer to this post HERE for instructions on that.
Once it’s printed, send it through the Silhouette to cut.

Success!

A perfect cut!!!

And ready for the little ones to enjoy.

I know that seems like a pretty complex tutorial.
It’s actually pretty fast, I just explained every step in detail
so it seems like a lot.
It’s actually pretty fast, I just explained every step in detail
so it seems like a lot.
You can do it, I promise!!!
_________________________________
Thank you so much, Tam, for guest posting today! I can't wait to try this myself and use it for a few other projects, too.
_________________________________
Thank you so much, Tam, for guest posting today! I can't wait to try this myself and use it for a few other projects, too.
269 comments:
«Oldest ‹Older 401 – 269 of 269Post a Comment