Wednesday, March 16

FABULOUS Cupcake Tree

When I came across this fabulous idea for a cupcake display from Icing Designs, I knew I had to share with my readers. This is such a quick project and makes quite a creative statement, too. How impressed would your party guests be if this were the centerpiece of your dessert table!

Photobucket

The girls from Icing Designs made a quick trip to Hobby Lobby and found these bendable branches in the floral department. After securing them in an urn filled with styrofoam, they bended them into a "tree form." Next, they needed something to rest each cupcake on and found some round wooden disks on the unfinished wood aisle of Hobby Lobby. They painted them brown and strategically hot glued them around the "tree" branches to balance the design.


Photobucket

How easy is that!


Photobucket

A sweet glittery owl is the perfect addition to this "Owl Always Love You" party theme.


Photobucket

For more details on this project and the party is was created for, visit Icing Designs blog. These girls rock, my friends! Such cute and creative ideas!
Photobucket

Tuesday, March 15

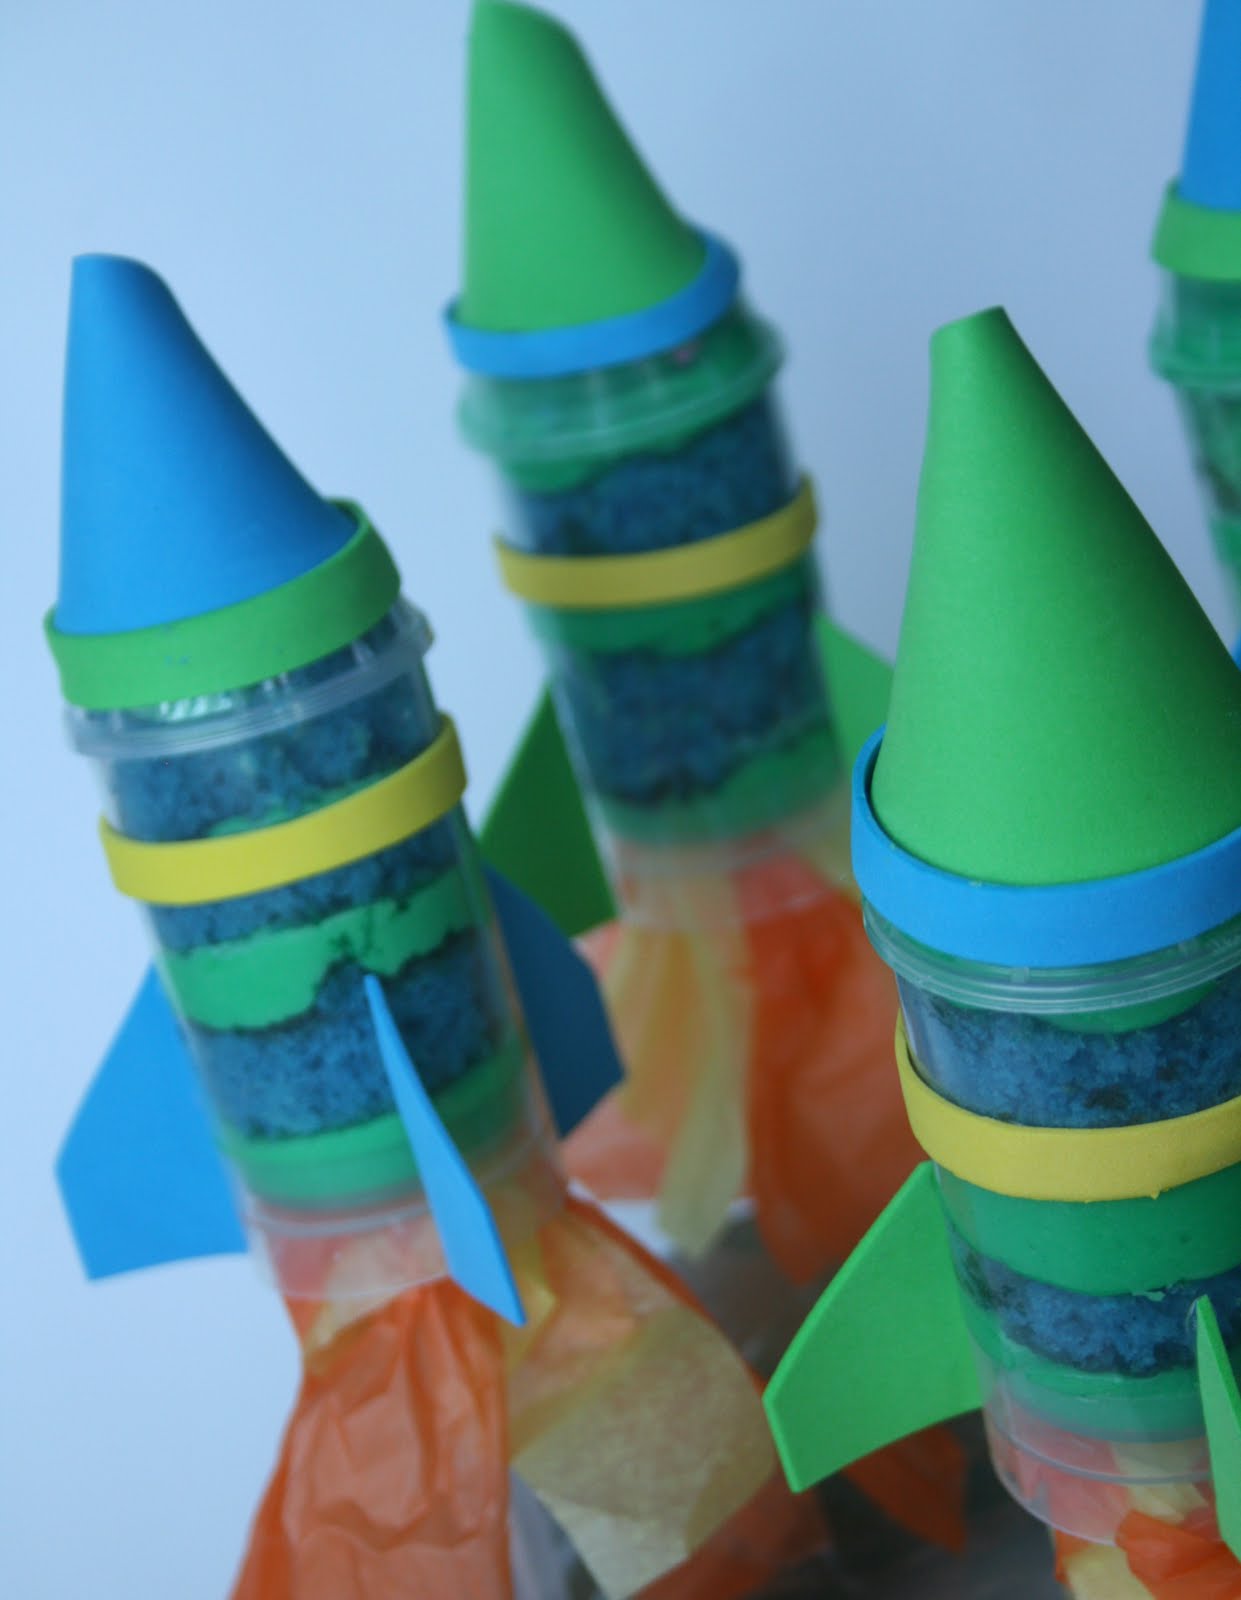
Rocket Ship CAKE PUSH POPS!

It's so much fun to discover new party ideas and these cake push pops are one of the best I've seen in a while.

Kate Petronis from And Everything Sweet made these ADORABLY CREATIVE rocket ship cake push pops for her client's Toy Story birthday party. Little Hayden was turning two and his mom wanted him to have a special treat for his birthday. I still can't get over how cute these are!

Kate used these disposable plastic cake push pops tubes (now sold out from all the party lovers trying to horde them!), and stuffed them with layers of cake and icing. Next she turned them into perfect little rocket ships using a few pieces of craft foam and some orange and yellow tissue paper for fire.


And that's not all..... Look how cute Hayden's rocket ship smash cake is!
That Kate is one talented girl!


And if you're like me and can't get enough of this cute idea, Kate has another blog post with more cute CAKE PUSH POPS like these pirate themed pops.....


And these sweet little Princess Party Pops. I love how easy these are to make.... no painstaking steps to perfect your royal icing techniques..... just layer it all in and voila! You're a genius!

Now if they would just get these babies back in stock!

Photobucket

Monday, March 14

DIY St. Patrick's Day Table

With St. Patrick's Day just a few days away, I thought it was a good time to share this adorable table from Sarah at Sheek Shindigs. Sarah is a master at creating a fabulous party table on a budget. With her DIY tricks and projects, simple recipes and great tutorials, she makes it easy for us all to recreate her fun ideas in just a matter of hours.


Photobucket

Sarah uses what she has lying around the house and a few easy, DIY projects to make a super fun holiday table that people of all ages can enjoy. Starting with a white tablecloth and some green dishes her grandmother gave her a few years back, Sarah sets the stage for some Leprechaun fun. I love the use of colorful gumballs in glass jars and all of the rainbow printables she used from a FREE download at Love the Day. Sarah also used some shamrock printables she designed (and in her Etsy shop) for the cute, jello picks.


Photobucket

And speaking of jello..... don't you just love this? So easy and quick and inexpensive, too! Sarah has a tutorial at Sheek Shindigs if you'd like to try this one yourself.


Photobucket

Simple clementines with rainbow flags propped up on snow cone holders add an easy and colorful element to the table. This is a great idea for a placecard holder as well.


Photobucket

Sarah makes her own adorable napkin rings using strips of ribbon in rainbow colors
and shows us all how to do it in a few simple steps.

Photobucket

Wrapping the ribbons around a green and white dot napkin and adding a printable shamrock topper completes the festive look.


Photobucket

Sarah also makes an easy favor bag using a green paper sack (found at a local craft store),
some ribbon and a shamrock printable circle.


Photobucket

These snack bags are another great idea from Sarah's table. No more dipping your own pretzels in melted chocolate.... Sarah makes good use of the pre-dipped white chocolate pretzels that can be found just about everywhere these days and adding a little holiday color with some green candy coating melted and drizzled on top. Put them in a cello bag, tie a little ribbon on top, and in minutes you've got a sweet St. Patrick's Day treat.

Be sure to visit Sheek Shindigs for all of the details and quick tutorials from Sarah's holiday table, and you, too, can put together a fun table in just a few hours.
Photobucket

Friday, March 11

Fruity Pebble Cupcakes

If you've got kids and they like sugar and they have birthdays, then I've got a little something that might interest you. (How's that for enticing?)


Photobucket

Fruity Pebble Cupcakes, my friends! Seriously, what child wouldn't want these little creations at their next birthday party? This little sugar overload from Ashley at Simply Designing as seen on Design Dazzle would make such a cute party treat. And, like most recipes that interest me, they are so simple to make! Here's Ashley's recipe:

Fruity Pebble Cupcake Treats

Ingredients:
1/2 stick butter
1 package mini-marshmallows (about 10.5 oz)
8 1/2 cups fruity pebbles (about 13 oz)
1 teaspoon vanilla (optional)
1 can vanilla / white frosting
Powdered sugar (optional)

Directions for the "Cupcakes":
Melt the butter in a microwave safe dish. Add marshmallows and continue microwaving until melted. Stir melted butter, melted marshmallows and vanilla (optional) together. Add the fruity pebbles cereal and mix until the cereal is evenly coated in the marshmallow mixture. Press the mixture into greased mini-muffin tins until firmly packed. When completely cooled, remove the fruity pebble cupcakes from the tins.

Directions for Icing:
For the icing, I typically like to make my own icing. However, I really do like to keep things simple, and these were being made for a group of 3 year olds who really wouldn't have known the difference! So I used premade, store bought icing. Mine was a little "soft" to pipe, so I mixed a bit of powdered sugar into the icing to give it a stiffer consistency. Add any food coloring you like to the icing (I prefer Wilton gel food coloring as you can get vibrant colors without using an entire bottle of food coloring and without changing the consistancy of the icing.) Place any tip you like in a disposable piping bag, put the icing in the bag and ice the cupcakes!


Doesn't this just make you say to yourself, "Why didn't I think of that?" And what about Cocoa Krispies.... those would be cute, too. I little chocolatey treat..... yum!

Photobucket

Thursday, March 10

Doughnuts for Parties

Move over CUPCAKE..... the DOUGHNUT is making quite a show on party and dessert tables these days. And why not? How cute are those little round treats! All of a sudden, doughnuts are everywhere from weddings to birthdays, all dressed up and ready to party. Frostings, glazes, sprinkles, non-pareils.... inventive, gourmet combinations and creative displays make doughnuts a great new trend in entertaining.

Just take a look at just some of the yummy ideas circulating around the web......

Sweet Tiffany blue doughnuts made by Sprinkle Bakes
using a fabulous mini donut pan from Sur La Table.


And another decadent creation from Sprinkle Bakes...
a fabulous Coffee and Doughnut Cake. I'm so in love with this cake!


And if you're in a hurry and don't want to make the sweet treats yourself, Dough a Deer makes these that you can order and have shipped straight to your door.


Photobucket

And how wonderful are these photos taken at various weddings
and events seen on Wed Share Daily.

Photo Credits: Dee’s Mini Organic Doughnuts by Divine Order Photography via Green Wedding Shoes,
Milk & Pretty Donuts on Dessert Table by April O’Hare Photography, “Snow” Coated Donuts On Custom Cake Stands by Justin Lee Photography via Inspired by This, Doughnut Tower Groom’s Cake Alternative via Yum Sugar


Photobucket

Photo Credits: Donuts on White Cake Stand via Project Wedding, Mini Doughnuts & Coffee Wedding Dessert via Martha Stewart Weddings, Heavenly Pink Doughnuts Platter via Country Living, Doughnut Dessert Wedding Reception Centerpiece via Martha Stewart Weddings, Wedding Cake Tower of Krispy Kreme Donuts via People by Ryan, Donut du Jour Signature Mini Donuts via Melissa Bagley


And now for a little "sneaky-peeky" from my own daughter's 10th birthday party last weekend. Yes we, too, decided it was "The Year of the Doughnut" and had to have a few of those yummy treats on the table. It was one of the kids' favorites! They were easy to make, too. I cheated a little and bought some mini donuts from my local Publix and then added a tasty icing in shocking pink and orange. So fun!

I'll post a recipe and tutorial soon. I hope you all were inspired to go a little "do-nutty," too!

Photobucket

Wednesday, March 9

Colorful Party Bites - Coconut Ice

Photobucket

I've been super busy lately putting together my middle daughter's 10th birthday party table, and I've been a little obsessed with trying to find colorful party food. Color was a big part of her party theme.... (hint, hint.... the big reveal will come soon!). I searched high and low for easy recipes that I could tint to just the right shade of her party colors, and in that search I came across this fabulous little creation on Mini-Eco. Kate made these with her son as a fun, no-bake treat that was easy to put together with a 3 year old. If a pre-schooler can do it, I think we all can, too!


Here's the recipe:
1 14oz bag of coconut, dessicated (see below)
1 lb of powdered sugar, sifted
1 can of condensed milk
1/2 teaspoon of food coloring

To Dessicate Coconut:
Preheat oven to about 250 degrees Fahrenheit. Place the baking sheet with coconut shreds and bake for approximately 5-8 minutes. The actual baking time depends on the moisture content of the coconut meat and the size of the coconut shreds. You can check the coconut pieces if complete dehydration is achieved or not. Once done, the dessicated coconut is dry and crispy to touch. If necessary, you can bake for another 2-3 minutes to get the desired dryness. After it is dry and cooled a bit, grind it in a blender to achieve a fine powder.


To make Coconut Ice:
In a large bowl, stir the dessicated coconut, powdered sugar and condensed milk together until you have a stiff, sticky mixture. Remove half the coconut ice to a clean bowl and add the food coloring, then stir again until the color is blended in smoothly. You may find it easier to mix with your hands as the mixture will be very stiff.

Line a small rectangular dish with cling film, making sure there is plenty overhanging at the sides. (Later, you will fold these overhanging bits over to cover the coconut ice.) Grease the cling film with a few drops of vegetable oil. Take the white portion of coconut ice and pack it firmly into the lined dish, making sure you produce an even layer. Pack the colored portion into a neat layer on top of the white layer. They will stick together firmly, thanks to the amazing adhesive qualities of sugar and condensed milk. Fold the cling film over the top and refrigerate the coconut ice overnight.

When the coconut ice is nice and firm from the fridge, turn it out of the dish, using the cling film to help, and peel the film away. Chop into little squares (a serrated knife is useful here), dust with powdered sugar and pack in wax paper.
Recipe adapted from Gastronomy Divine


I just love this idea! Coconut ice in a rainbow of colors would be so pretty on a party table. I can just see it on skewers or even packaged up as a yummy take home party favor. It's the perfect way to coordinate party colors and enjoy a sweet treat, too.

Photobucket

Tuesday, March 8

Pot of Gold Cupcakes

I love a lady who makes really cute desserts, especially the ones that look like a million bucks but are really super easy to make. Kristan from Confessions of a Cookbook Queen is one of those girls, and today I'm sharing her oh, so cute Pot of Gold Cupcakes.

Photobucket

Aren't these adorable? She featured them for a little St. Patrick's Day celebration idea, but how perfect would these be for rainbow parties or Wizard of Oz parties, too?


Photobucket

Kristan makes good use of easy to find grocery store candies like licorice, mini m&m's, dark chocolate candy coating and doughnut holes to create the most adorable decorations for her St. Patty's Day green cupcakes.

She says, "I cut some inexpensive wooden skewers in half, inserted them in donut holes, and dipped in melted candy. I used dark chocolate candy melts, colored with black candy coloring (I usually buy my candy coloring at Hobby Lobby or Michaels).

Stick the skewers in a block of styrofoam or floral foam and while wet, attach a cut piece of black licorice and yellow mini M&M's. Make sure the M&M's don't all lay flat--you want some of them standing up to give dimension. Once set, stick skewers in cupcakes frosted with green frosting. I sprinkled my frosting with these pretty green sugar pearls."

Ingenious, don't you think? To save a little more time, you could even buy the cupcakes from the grocery store, too, and then it's just a matter of making the pots of gold. Adorable!

Be sure to visit Kristan's fun website -- she's got so many fabulous, easy creations from her kitchen and she's sure to bring out a belly laugh, too!

Photobucket

Monday, March 7

Lollipop Cookies

Color is definitely catching my eye these days when I'm blog hopping for party ideas. And these play dough cookie lollipops were a real find. I love anything that's easy to make and adapt to your own party colors. A simple recipe, a little food color and you've got a perfect party table treat.

There are quite a few versions of these on the web, including the ones above from Blogoye with a step-by-step photo tutorial, but unfortunately the directions are in Serbian and a wee bit difficult for this Southern girl to understand. Which, in turn, led me straight to this great photo.....

Evite.com has a Flickr site with another set of step-by-step photos using a recipe for Play Dough cookies from All Recipes.

Here's what you'll need:
3/4 cup butter, softened
3 ounces cream cheese
1 cup white sugar
1 egg
1 teaspoon vanilla extract
2 3/4 cups all-purpose flour
1 teaspoon baking powder
1/4 teaspoon salt
assorted colors of paste food coloring
24 lollipop sticks

First, you'll need to cream the butter, cream cheese and sugar until fluffy. Add egg and vanilla and beat until smooth. In a medium bowl combine flour, baking powder and salt. Add dry ingredients to the creamed mixture and stir till soft dough forms.


After making the basic dough, divide it into separate bowls and tint each with food color to achieve your desired colors. Wrap each bowl with plastic wrap and refrigerate for 2 hours. After the dough chills, roll each color into 3/4 inch dough balls.


Next press your colored dough balls together into one larger ball and then roll into a 12" long snake as pictured below.


Take your snake and coil it around into a 2 3/4 inch round cookie. Place on a lightly greased baking sheet, 3" apart and insert a lollipop stick into each cookie. Bake at 350 degrees for 8 minutes or until lightly browned.


Adorable!


And while we're talking playdough cookies, check out this great version from National Cookie Network. So cute! Rainbows seem to be taking over the party world, and you know, with such a long, cold winter, it's no wonder.

Happy Monday Everyone!
Photobucket