Monday, March 19

FREE Easter Printables Set for Operation Shower

Photobucket
Today I have EXCITING NEWS! I've decided to post another FREEBIE for Easter!

And this one is a
FULL SET OF EASTER PRINTABLES!

Perfect for Easter brunches, Easter Egg Hunt Parties and family & church get togethers. It's packed full of files and includes some adorable polka dot bunny cut outs as well as some sweet cross cut outs, a banner, cupcake toppers and more.

All I ask is that you visit my NEW FACEBOOK Fan Page and Click LIKE below:


 I created this set last year to raise donations for a very worthy cause, Operation Shower. What's Operations Shower, you say? Operation Shower honors military families by providing joyful baby showers for expecting military wives.

Through your donations, Operation Shower is able to host amazing baby showers for expectant military families, deliver high-quality products for the showers and create a shared, memorable experience for those families who do so much for us.


I hope that once you download the FREE EASTER PRINTABLES, you'll be sure to...  

1. Check out Operation Shower’s website to find ways to donate or volunteer.


3. Facebook/Tweet/Blog about this FREE EASTER DOWNLOAD to help spread the word Operation Shower.

4. Donate to Operation Shower here.


There are lots of really cute printables for Easter fun and could
also make sweet favor tags for friends and Sunday school teachers!

Thanks everyone for supporting our military families!

Sunday, March 18

Tutorial for Easter Basket Favors

Have you got Easter on your mind yet? It's just around the corner and we'll all need some creative ideas for fun Easter favors and treats.

Today I thought I'd share a simple little tutorial of Easter basket favors made from the cupcake wraps and party flags from the EASTER PRINTABLES COLLECTION. How much fun are these! And so simple to make, too. If you don't want to buy the Easter collection, you can always make your own using scrapbook paper or cardstock and the cupcake wrap template HERE.
Here's what you'll need:

- Mini Robin's Eggs (Whoppers brand malted eggs)
- Green Easter grass
- Paper Nut/candy cups (find on cake decorating aisle of craft stores)
- Printable cupcake wraps and straw flags (or some scrapbook paper of your choice)
- Hot glue and gun
- Scissors
- Scotch tape
- Easter suckers (mine are from the Dollar Tree - $1.00/6pieces)
- Piece of green florist foam or styrofoam


Photobucket
Step 1: Print and cut your cupcake wraps and toothpick flags out.


Photobucket
Step 2: Assemble cupcake wrap by wrapping around nut cup and securing with tape.

Photobucket
Step 3: Now take your straw flag piece and hot glue one edge inside the cupcake wrap.... then glue down the other side to create a basket.

Photobucket
Step 4: Cut small pieces of green florist foam or styrofoam into squares and hot glue to the bottom of your paper nut cup.

Photobucket


Photobucket
Step 5: Stick Easter egg sucker into your florist foam and add a few robin's egg to weigh down the cup so it won't tip over.


Photobucket
Step 6: Add Easter grass and robin's eggs.

Photobucket
Step 7: Dab a small bit of hot glue to the back of your sucker where it meets the handle of your basket and adhere the sucker to the handle. This way the sucker will stay in place.

You're done -- that's all. EASY! If you'd like, at this point, you could wrap each basket in some cellophane and tie it up with a sweet ribbon and favor tag to give to classmates, teachers or Sunday School classes.

I hope you enjoy this simple little Easter project. 
______________________________________________

Monday, March 12

Easter Bunny Cupcakes

Photobucket
Today I'm sharing a fun little Easter Bunny Cupcake that was a real hit last Easter. I love the idea of a no-bake dessert and wanted to make a simple little Easter treat. I decided to use a few supplies that I had in the house and create something special for the kids, Mr. Easter Donut Bunny!

He would also make an adorable centerpiece for a plate of colorful cupcakes if you didn't want to make a pile of donut bunny cupcakes. I think putting him in the center surrounded by pastel colored cupcakes with some easy embellishments like chocolate eggs and green-dyed coconut for "grass" would be so sweet.

This is what you'll need:

-Cupcakes
-Powdered donuts
-Pink marshmallows (I used the heart kind because that's what I had, but you could also use the small pastel ones that you can find in stores now)
-Black round sprinkles
-Red mini M&Ms
-Pink peanut M&Ms (or jelly beans would work, too)
-Small white marshmallows
-Toothpicks
-Karo syrup (light corn syrup)
- Clean paintbrushes
- Uncooked angel hair pasta noodles (or spaghetti noodles)
- Black food coloring
- Colored coconut (or you could use green sparkling sugar or green sprinkles for grass)
- Can of white frosting (to act as glue)


Step 1: Add a little colored coconut to the top of your cupcake (you can color coconut by placing a little green food dye in a small plastic container with a lid and adding coconut - then put the lid on and shake until the coconut is dyed). Put a donut on top of your cupcake and insert a toothpick into another donut and stand it on top of the first donut.

Step 2: Cut another donut in half to make bunny ears.

Step 3: Add a half of a toothpick to each ear and stick them on top of your middle donut.

Step 4: Add a little white frosting to the center of your middle donut.

Step 5: Make a nose by placing a pink peanut M&M or a jelly bean into the icing and hold for a minute until it sticks.

Step 6: Cut a small white marshmallow in half for the eyes. Next, add a little Karo syrup to your marshmallow with a paintbrush and adhere a round black sprinkle to the center for an eyeball. If you can't find round black sprinkles (I get mine around Halloween at Walmart), just use a black edible marker to make a pupil or you could just use chocolate chips for the eyes. Now add a little white frosting the back of your marshmallow and place it on your bunny face above the nose. Repeat for the other eye.


Step 7: Cut your pink heart marshmallow in half and pinch the sticky side together to make the marshmallow rounded. Add frosting to the back side and place under the bunny's nose to make cheeks. Repeat for the other cheek.


Step 8: Add a mini red M&M in the middle of the cheeks for a tongue. You can attach it with a little frosting.

Step 9: Use a clean paintbrush to brush some black food coloring onto a piece of uncooked angel hair pasta (or spaghetti noodle). Wipe off the excess with a paper towel, and then cut your noodle into pieces about 1.5" long. Use a toothpick to make 3 small holes on each side of the bunny's cheeks and place the noodle inside the hole with a little frosting.


Step 10: Pat yourself on the back -- YOU DID IT!!


Photobucket

Cute! Cute! The kids will love them! Just be sure to serve them to older kids and tell them about the toothpicks. If you want to serve them to the younger kids, just remove the toothpicks first.
_________________________________________

Friday, March 2

Winter ONEderland {Customer Party}

Sorry I've been MIA lately guys! No fear.... lots of fun things in store for Amanda's Parties To Go!

I've been working up a creative storm of sorts designing some new party sets and collaborating with some wonderfully talented ladies in the party business. And LUCKY for you... I've got an upcoming St. Patty's Day freebie, too, so stay tuned!

Until then, I thought I'd share a sweet party my customer, Andrea of Martin Lane Designs, sent me of her daughter’s Winter Wonderland 1st birthday party. This is one to save or bookmark for next winter with some cute ideas and DIY projects, too.


In describing the party Andrea says, "Since our daughter was born in the middle of a crazy blizzard, we decided on a winter wonderland theme for her 1st birthday party. My color inspiration came from the snowman birthday party package that I purchased from Amanda's Parties To Go. The package had a great combination of pink, lime, and robin’s egg blue with polka dot accents. So, I carried the theme throughout the rest of the party decorations. All of the printable papers and signs really came in handy for my DIY projects. Best purchase ever."

Well, Andrea, I'm so glad you like the set! It really is a cute one.


Andrea designed the invitation herself saying it's her favorite part of throwing a party. She found a basic set of white cards and envelopes in her supply stash. First, she designed the invitation layout and printed out the text for each invitation. Then, she used the 2” and 2 ½” circle cutouts from my SNOWMAN PARTY PRINTABLES to decorate the front of the invite. Voila. Simple and cute invitations.

I'll let Andrea tell you more about her great DIY projects...


"I bought bright white pom-poms and pre-cut snowflakes to hang from the ceiling. For the dessert table, I decided to use white and clear serving pieces so that the goodies really stood out.


The balloon backdrop was inspired by this falling snowflake garland via Oh Happy Day! Super whimsical and easy. The Happy Birthday bunting banner was created by moi but I found this great bunting pattern template at Chickabug. 

My favorite pieces on that table have to be the Lollipop Forest trees. They were so easy to make and really added a fun element to the table.


The desserts were all winter themed - frostbites (cookies), fluffy snow (cotton candy), ice crystals (rock candy), snowballs (rice krispie treats rolled in pearlized sugar), snow stacks (powdered donuts), candy canes and of course, cupcakes!

We also had a hot chocolate bar with different toppings to add - mini marshmallows, crushed candy canes, whipped cream, cinnamon, and sprinkles. 


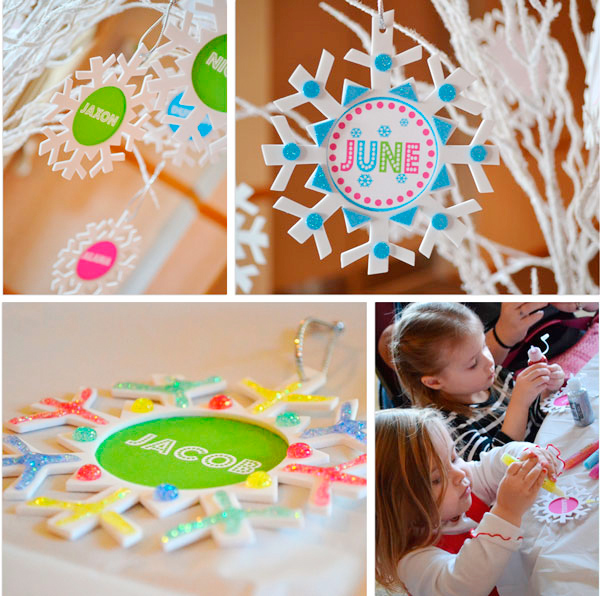
In order to keep the kids occupied, I had a few things in mind. First, was creating a “Snowflake Station” where the kids could decorate their own snowflakes. I bought some snowflake ornaments from Target (Christmas clearance racks).

The circle in the middle is actually supposed to be for a picture but instead, I printed out different colored circles with each child’s name and glued them to the back. The snowflakes were all hung on the white, glittery tree branches, waiting for them to decorate.


We also had an “Adopt-a-Penguin” station, where each kid could pick out an inflatable penguin to take home. I loved how cute they were and the fact that they kept the kids occupied for the entire party."


Andrea reminds us, "The beauty of having a winter wonderland birthday party is that all of the decorations can be re-used during Christmas and the winter season as well. Or, you can use your existing winter Christmas decorations instead of buying new ones." 

Thank you, Andrea, for sharing your adorable party with us! Be sure to visit Andrea at her blog, too!


VENDORS:

Party Printables: Amanda's Parties to Go
Invitations: DIY, (snowman graphics provided by Amanda's Parties to Go)
Polka-dot Balloons: Amazon
Happy Birthday Banner: DIY
Lollipop Forest Trees: DIY, (snowman graphics provided by Shindig Parties to Go)
Snowflake Ornaments: DIY/Target
Cookies: Sugar and Flour
Penguins: Oriental Trading Company
_____________________________________________________________________