Last week I had the wonderful opportunity to guest post over at
Under The Table and Dreaming as a part of
Stephanie Lynn's Handmade Holidays week. Stephanie hosted a wonderful Christmas crafting party sponsored by DOW using its' STYROFOAM™ Brand Foam products. There are some fabulous tutorials for all kinds of holiday crafts so be sure to check out all 25 of the bloggers featured.
For my own feature, I decided to do a fun Snowman Centerpiece. Being in the party business, I'm always on the lookout for a special centerpiece to make a statement on my party tables. With Snowman parties being one of my most requested celebrations this time of year, a SNOWMAN CENTERPIECE is the perfect focal point. And using STYROFOAM™ Brand Foam makes indoor snowman building as simple as it can be!
Materials you'll need:
- STYROFOAM™ Brand Foam: One 12” ball, One 6” ball
- 10" cardboard circle (I used a 10" cake round)
- Florist foam
- Assorted buttons (4 large and 4-5 medium)
- Wire metal hanging planter basket
- 4.5" x 14" piece of cardboard or stiff paper
- Black felt for hat (I purchased about 1/3 yd)
- Wood dowel
- Wood skewer
- White pom poms
- Small piece of orange felt
- Glue, hot glue, scissors, pen, packing tape
- Batting
- Fabric for scarf (or use a pre-made scarf)
- Ornament plastic candy canes (2 for arms)
- Ribbon and felt flower for hat (optional)
1. Place your green florist foam under the planter basket and insert your wooden dowel into the foam.
2. Place your large 12" STYROFOAM™ Brand Foam ball on the dowel and push down to skewer into place
3. Repeat step 2 for your 6" STYROFOAM™ Brand Foam ball
4. This is what it should look like when you're done with steps 1-3.
Making the carrot nose:
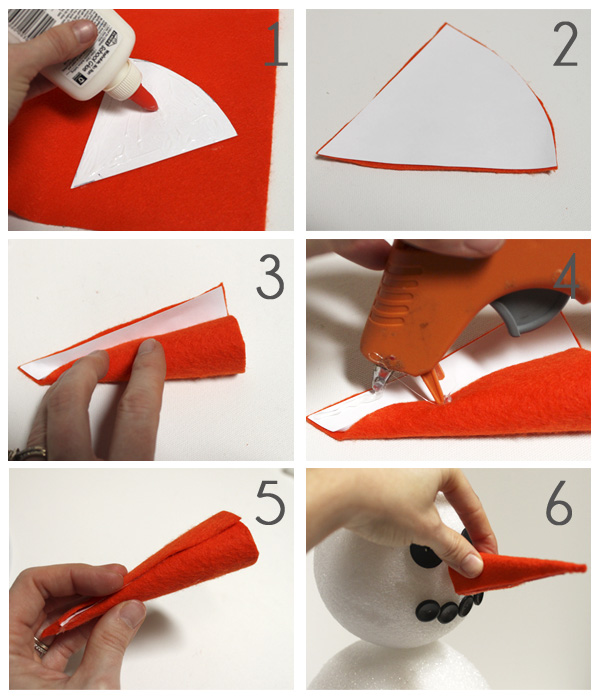
1. Make a triangular shaped template from some white cardstock, cut out with scissors and put some Elmer's glue on it.
2. Place the glued side down onto your orange felt piece.
3. Roll your felt piece into a carrot shape.
4. Hot glue the tip of the nose together and then continue down the length of the nose
5. Press down on the hot glue until it dries.
6. Hot glue your wooden skewer inside the nose and place the end of the skewer into your 6" STYROFOAM™ Brand Foam ball.
1. Hot glue your buttons onto the snowman's face to make his eyes and mouth. Then glue two large buttons to his belly.
2. To make the scarf, cut a length of fabric about 30" long and 10" wide. Fold the raw edges of the fabric under and crease to a 5"x 30" length of fabric with an iron. Next, glue the white poms onto the edge of your snowman's scarf to finish it off.
3. Wrap the scarf around the snowman's neck.
To make the Snowman's Top Hat Brim:
1. Find a circular shape approximately 4" in diameter and trace a circle in the center of your 10" cardboard cake round.
2. Cut the 4" center circle out with scissors. Save this circle for future steps.
3. Fold your black felt piece in half and place the cardboard "doughnut" on top. Trace the outline of the "doughnut" onto the felt with a pen. You will be cutting out two pieces of felt... one for the top of the brim and one for the bottom.
4. Cut pieces of felt out approximately 1/4" outside the lines marked in the previous step.
5. Put glue on the cardboard doughnut and center on top on the felt and press down to secure.
6. Flip your doughnut over and glue the other side. Place the second felt piece on top and press down to secure the felt to the cardboard.
7. Hot glue the edge of the cardboard in between the two pieces of felt.
8. Press the top and bottom edges of felt together to cover the cardboard completely and finish the edge of the brim.
To make the Top Part of your Snowman's Hat:
1. Cut a piece of cardboard or thick paper to about 4.5"x14".
2. Take the 4" cardboard circle you created from Step 2 above, place it on top of the black felt and trace around the outline of the circle. Cut about 1/2" outside of this line to create a black felt circle. Next, cut a 4.5"x 14" piece of black felt which will be used later to cover the outside of your hat.
3. Take your 4.5"x14" piece of cardboard and roll it into a cylinder shape. Secure with packing tape or duct tape.
4. Take your 4" cardboard circle, place it on top of the cardboard cylinder and use packing tape to secure it to the top of the cylinder.
5. Cut notches around the entire black felt circle about 1/2" apart. Glue the black felt circle to the top of the cylinder.
6. Glue the notches of the circle down to the sides of the cylinder.
7. Glue the 4.5"x 14" piece of black felt to the outside of your cylinder.
8. Hot glue the base of the cylinder down on top of the brim of your snowman hat.
Next, just insert the plastic candy cane ornament arms, place him on a table and add your cotton batting around the base. I also spinkled a little "fake snow" on top of the batting and added a few snowflakes here and there to liven him up a bit. Isn't he a cutie?
I love this project because it can be suited for all kinds of Christmas parties and all kinds of personalities. Just as every outdoor snowman has his own personality, you can your own special little "personal" touches to your snowman. Here, I added a little ribbon and a craft store felt poinsettia flower to the snowman's hat to coordinate with my party table.