Monday, December 5

Christmas Tree Cupcake {Guest Post}

Today I'm so happy to have Kate Petronis, the amazing cake and fondant designer from And Everything Sweet guest posting with a wonderful holiday treat.... a
CHRISTMAS TREE CUPCAKE 
You are going to love this one! So creative! I'll let Kate show you how......
_______________________________________


Don’t you just love the holiday season!?!?

Every time I turn around there is something special going on, some kind of celebration.
And where there is a celebration there is a need for sweets! 

Pin It

 This morning I woke up early to make these cupcakes for my girls’ daily advent calendar surprise. They were easy and WELL received. If you like frosting you’ll love these!!!


Supplies: First, (and you probably already knew this) you need cupcakes. I baked red velvet mini cupcakes b/c I didn’t want to sugar my kids up toooo much, but I think these would be great as big cupcakes as well.

Then you need icing in a pastry bag with a 2A tip. (I used cream cheese icing to compliment the red velvet). You’ll need green candy melts, some mini m&ms, and some yellow Laffy Taffy or yellow Starburst.


Stick the iced cupcake in the freezer for about 10-15 minutes to let the icing really firm up and chill. You’re going to be dunking it into melted candy so you want the icing to be nice and cold so it survives the plunge. This step is important to avoid any icing melting and falling off into the candy melts or losing its shape under the heat of the candy. Trust me, that’s no fun and it might make you say things out of frustration that you’d like to later take back. And no need to have the candy super hot…just warm enough to be melted.

While your cupcakes are chillin’ in the freezer melt your candy melts in a cup or bowl tall enough for dipping. I used a little drink cup since I was dipping mini cupcakes. It worked perfect. I also added a little spoonful of shortening to the melts to make it just a little thinner.


Pull it out…


And.....


Now you can trim the tree! Act quick before the candy completely dries. I used mini m&m's for the ornaments and I heated up a Laffy Taffy in the microwave for a couple of seconds to soften it up so that I could roll out a “snake” to wrap around the tree. The star is also Laffy Taffy (Starburst works as well).


Here’s an inside look…As you can see its about 70% icing, 20% cake and 10% candy. My girls said, “Is it real? Can I eat it??” In their eyes (as icing loving girls) it looked too good to be true!!!!


Check out the size of that bite! That’s what I call goin’ for it!!!!

Hopefully you have a little fun with baking this holiday season. 
 And whatever you do, try to forget about the calories! 
 (that’s what New Years resolutions are for!!!)
Merry Christmas and happy baking!!!!
_____________________________________________

Thanks so much, Kate, for your wonderful tutorial. Who knew Christmas Tree cupcakes could be so easy to make, and I have a couple of those "icing girls" myself who would love to take a big ole bite, too!

Friday, December 2

Hot Cocoa Bar Ideas

As promised, today I'm sharing the photos from the Hot Cocoa Bar which were a part of the dessert table photo shoot I styled for Amanda's Parties To Go's latest Christmas printable set, Candy Christmas.

This is such a fun and inexpensive idea for holiday parties. Include lots of candies and sweet toppings for family or children's parties or add some mix-ins like Kahlua or peppermint Schnapps for adult parties. It comes together quickly, too, with mostly store-bought products.


Food labels from the Candy Christmas printables set were used to label sundae glasses filled with various store bought yummies like M&M’s, chocolate chips and toffee. Batting was used under the glasses to simulate “snow” and some "softness" to the metal stand.

Pin It

I love to have a backdrop behind all of my party tables, and this hot cocoa was no exception. Using various widths of white ribbon and white tulle stapled onto a 1”x4” board created a simple ribbon backdrop. Adding some craft store snowflakes hung on fishing line completed the wintry look. 


Peppermint marshmallows, chocolate covered peppermint sticks and chocolate peppermint spoons were placed close to the cocoa mugs for fun stirrers. 


Mugs were embellished easily with some tied ribbon, a plastic candy cane (from a garland purchased at Hobby Lobby) and a printable "Yum" logo. 

An oversized snowman made from styrofoam balls was a fun focal point for the bar. If you'd like to find out more about how to make your own, you can click here: SNOWMAN CENTERPIECE.

Covering your thermos' and other containers with a little decorative tissue paper, ribbon and a printable logo turn the not-so-pretty into something perfectly fitting for your cocoa bar.


Covering peppermint sticks with white candy coating and adding some sparkling sugar makes wonderfully sweet cocoa stirrers.

A hot cocoa mug logo from the printables collection was used as a focal point on the front of the table. The garland was made using some strips of white tulle and Dollar Tree snowflakes.


The CANDY CHRISTMAS printables set is available for only $9.00 in my Etsy shop right now and includes the hot cocoa bar printables, too!
To see more photos from the dessert table using this printables set, just click here:
DESSERT TABLE


Thursday, December 1

{FREEBIE} Christmas Hershey's Kiss Printables!

Pin It

Ready for a new FREEBIE?

I hope you'll all love this sweet little Hershey's Kiss sticker and Treat Bag topper printables set that I've designed for all of my fabulous readers and customers!


The printables include 11 different Kiss designs that coordinate with the Amanda's Parties To Go's
  CANDY CHRISTMAS printables set, you can make sweet gifts for teachers, 
neighbors and friends quickly and easily this holiday season. 


You will need to print onto 8.5"x11" sheets of STICKER PAPER. 

You can purchase this paper at local office supply stores, but I've found the absolute best sticker paper which produces glossy, professional looking stickers can be purchased at Onlinelabels.com here. 

After printing the kiss stickers, you can use a 3/4" circle punch to punch them out and then adhere them to the bottom of Hershey's Kisses, Rolos or even mini Reese's Cups.

To create gifts, you may also use the Treat Bag Topper printable to fold over 4"x6" ziploc bags (found on the jewelry aisle of craft stores) and fill them with your kisses. Or you could use another container such as the mason jar that I have in my photos embellished with a little ribbon and a candy cane. There are so many options.... just use your creativity! 


DOWNLOAD HERE FOR FREE CHRISTMAS HERSHEY'S KISS STICKERS

In return for the freebie, I hope you'll all become a FAN of Amanda's Parties To Go on FACEBOOK by clicking the LIKE button here:
FACEBOOK FAN


If you like the kisses, be sure to check out the
CANDY CHRISTMAS printables set that coordinates and DESSERT TABLE and HOT COCOA BAR ideas I styled, too.

The set is only $9.00 right now (60% off!) and includes 30 versatile Christmas designs for all your holiday parties and decorating.

Enjoy the FREEBIE everyone!


Candy Christmas Dessert Table

I've been anxiously awaiting the day I could reveal the photos from my CANDY CHRISTMAS party photo shoot and after it ran on Celebrations at Home (yippee!) yesterday, I now have permission to share with my readers. Candy and Christmas just seems to go together and I've wanted to style a table like this for such a long time. It was a true labor of love, and I hope it inspires you with your own holiday parties and dessert tables. Lots of details and DIY tips to follow after the photos....

Pin It


I've always loved the idea of a Candy Christmas with lollipops and peppermint, gingerbread men and candy canes. For the table, I wanted to set a holiday scene with an eye-catching backdrop.  I got the idea while re-decorating my little boys' room and having a few frames left over which I thought would be perfect for showcasing some over-sized crafted candies made from felt, styrofoam and cellophane.

These are an easy craft and come together in no time at all for very little money. The smaller styrofoam circles for the candies came from the Dollar Tree and the larger ones for the lollipops were purchased at Hobby Lobby. I cut templates from the circles and then cut out the shapes for the candies and the swirls. Then I placed the template onto felt, outlined it with a marker and then cut the pieces out. Next, I glued them onto the styrofoam, wrapped them in cellophane and added some ribbon to tie them off.

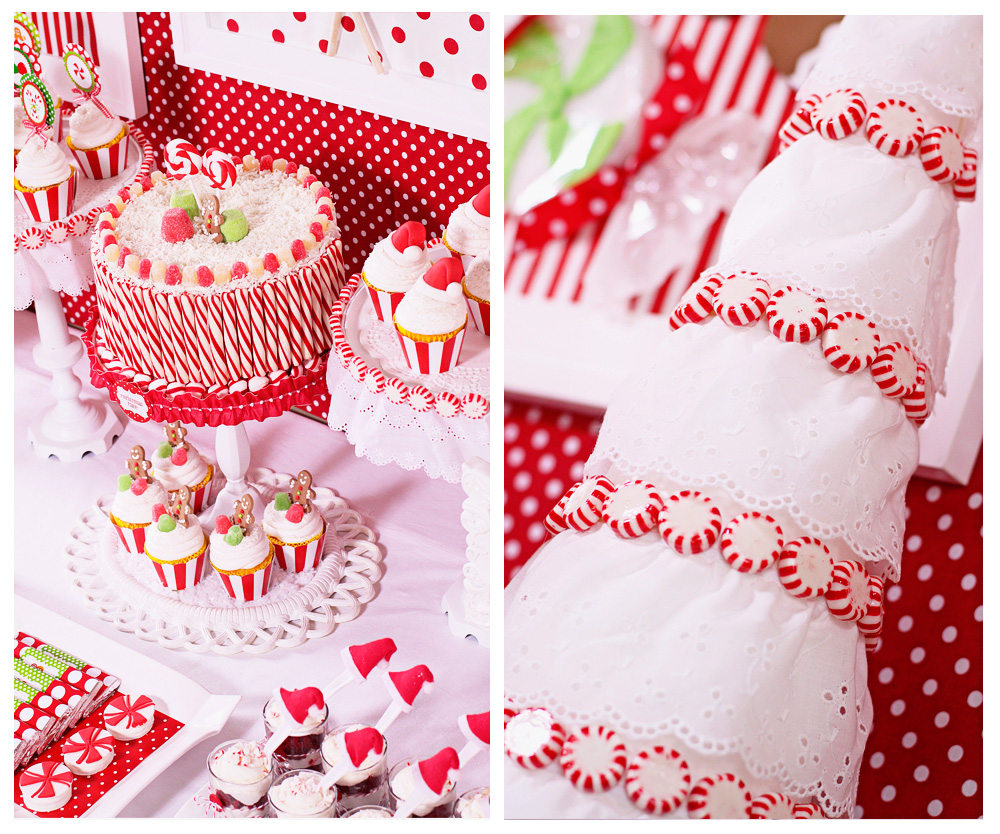
I love using thrift items to create unique table displays and created the cake plates from brass candlesticks and some plastic circular lazy susans found at Goodwill. After painting the candlesticks and lazy susans with white spray paint, I glue them together and then hot glued the eyelet around the edge of the plate. Adding a border of peppermints (adhered with hot glue) finished the edges and tied in perfectly with the candy theme. For the three candlesticks and the four platters, I spent a total of $9.50!

The topiary trees were another easy craft idea. For the taller trees, I used a poster board rolled into a cone shape and then alternated rows of 4" eyelet with rows of cherry fruit slices, glued on with hot glue (a crafting girl's best friend!). The smaller trees were heavier with more candy so I used a plastic megaphone-shaped cone from the Dollar Tree as a base and then covered it with white poster board. Next, I alternated gluing rows of peppermints with rows of the cherry fruit slices.

For the tablecloth, I used a white table cloth I already owned and bought two yards each of three different fabrics to create ruffles. This was a fun idea and created a bit of drama to balance the backdrop of the dessert table. Adding a store-bought red bow completed the look.

I was thrilled to collaborate again with the brilliantly talented Brittany Rumohr of Edible Details who created all of the amazing fondant toppers on the table. For the cake, I made my mother-in-laws famous coconut cake (a must-have at every holiday get together), surrounded it with peppermint sticks and topped it off with some of the Edible Details fondant lollipops, gingerbread men and jumbo gum drops.

From the fondant toppers on the cake to the Santa hat cupcake toppers, peppermint cookie toppers and the sweet little gingerbread men, I love how fondant makes it easy and quick to turn ordinary baked goods into something extraordinary. The cupcakes were all store-bought and believe it or not, the cookies were simply white chocolate covered Oreos which you can find for the holidays in grocery stores everywhere.

Over-sized campfire marshmallows dipped in white chocolate candy coating and then sprinkled with crushed peppermint are another simple but fun treat for a party. Adding a striped paper straw "stick" from Shop Sweet Lulu makes them fun and easy to eat, too. These make great party favors or classroom treats when wrapped individually with cellophane and tied with ribbon and a gift tag.

The Candy Christmas printables set was used throughout the table as dessert labels, cupcake toppers, cupcake wraps and more. One of my favorite ideas was the Santa hat cake pop holders. I printed the red and white dot paper from the printables set and cut cone shapes out. After rolling them into santa hat shapes, I added a little fur trim and topped them off with a cake pop for Santa's pom pom.

Red velvet cake parfaits were made in individual servings and topped off with cream cheese frosting and a sprinkle of crushed peppermint candy. Miniature felt Santa hats from Hobby Lobby made for a fun embellishment on the serving spoons.

Store-bought rice crispy treats already cut into serving size portions were dipped in white chocolate candy coating and then drizzled with red candy coating. Adding a small ribbon bow and a gingerbread logo from the Candy Christmas printables set made the simple desserts stand out.

Miniature candy wraps from the Candy Christmas printables set were placed in a glass bowl on the table and also placed inside of take home favor bags along with a few homemade holiday cookies.

Utensils were wrapped in red paper napkins and secured with a 2" peppermint candy printable from the collection and some white grosgrain ribbon made to resemble wrapped candy pieces. Drink glasses were simply small mason jars embellished with red and white checked ribbon and a sweet red button.

Tomorrow I'll share some photos from the fun hot cocoa bar. It was such a fun table to put together. I hope you have found a few favorite ideas for your own holiday tables.

VENDORS: Amanda's Parties To Go - Party printables / Amanda Parker - table styling, crafts, and photography /  Edible Details - Fondant cupcake and cake toppers / Online Labels - Label paper for drinks and candy bar wraps / Shop Sweet Lulu - Striped paper straws / The Twinery - Baker's twine / Hobby Lobby - ribbon, felt, fabric, eyelet, large gingerbread men