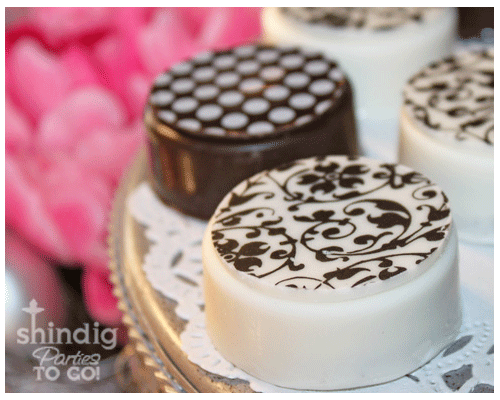

Chocolate transfer sheets (I bought mine from Fancy Flours on the web)
Circle cookie cutter just a bit smaller than the Oreo mold cavity
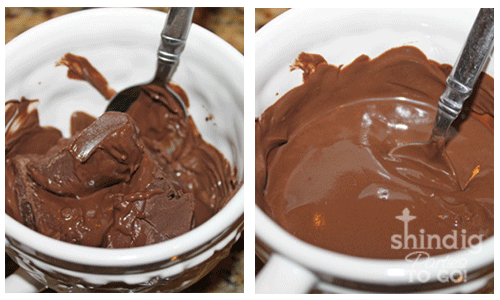
Step 1: Melt your chocolate candy coating in the microwave. Put a few squares of chocolate in a glass or ceramic bowl and place in the microwave on 50% power for about 1 minute. Take out, stir and put back in at 50% power for 15 seconds. Keep repeating until the chocolate is melted but be sure not to overheat - it will burn the chocolate and that is a definite no-no. We must not burn the chocolate! Never, ever waste chocolate.
Ever.

Step 2: Spoon some melted chocolate into your Oreo mold about a third of the way full. Place a Double Stuff Oreo cookie into the chocolate and press down until the top of the cookie is level and just a bit lower that the top of the mold.
Spoon more chocolate over the cookie until it is covered with chocolate. Tap the mold against your countertop to make sure all air bubbles are removed and that the chocolate has gotten down on the sides of the cookie. Next, take a offset spatula or some other flat and straight tool like the back of a large knife and scrape across to level the chocolate out.
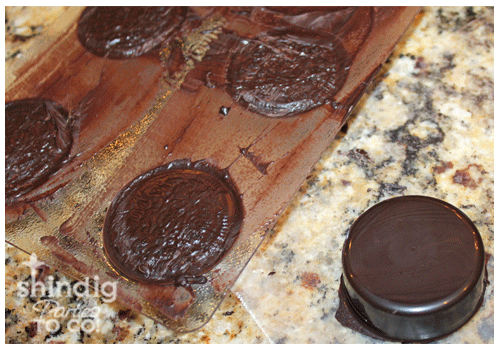
Step 3: After filling each of the cookie mold cavities with an Oreo and chocolate and scraping across the top to level off each cookie, place the mold in the refrigerator for about 10 minutes or until the chocolate has firmed up.
Turn the mold over and pop out each chocolate covered cookie. You'll be amazed how perfectly formed they are and how easy it was to make them.
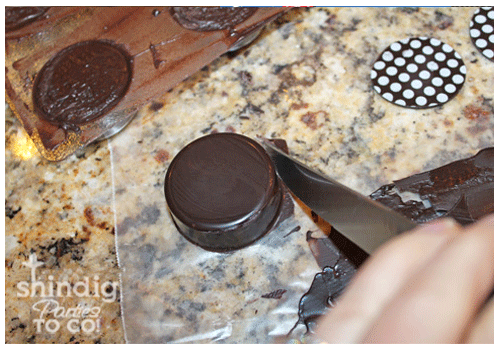
Step 4: Next, take a sharp knife and run around the edge of the cookie to cut off any excess chocolate. Smooth all around the bottom edge with your fingers. (Uhh.... I think I forgot to tell you to wash your hands, but I'm hoping you did that way before Step 1.)
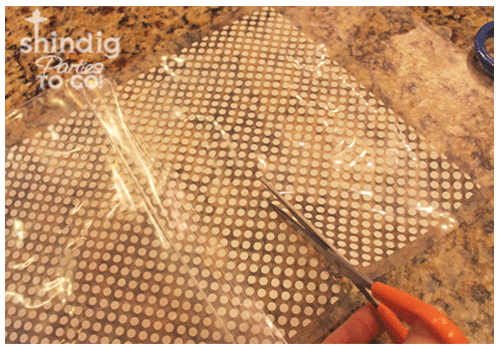
Step 5: Take your chocolate transfer sheet and cut off only the portion that you will be needing. My mold had 6 cavities so I cut a piece wide enough to cut out six circles that would fit on top of the chocolate covered Oreo cookie.
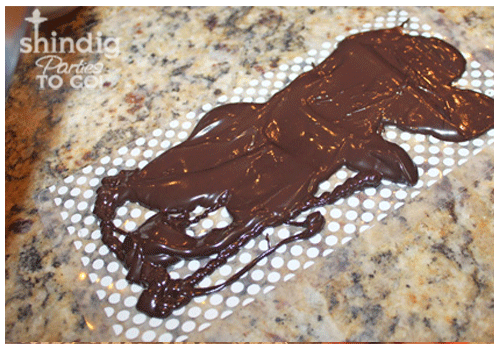
Step 6: Place the transfer sheet on top of piece of wax paper (I sprayed the bottom side of the wax paper with Pam cooking spray so that it wouldn't shift around the countertop). Next, pour out some of your melted chocolate on top of the chocolate transfer sheet.
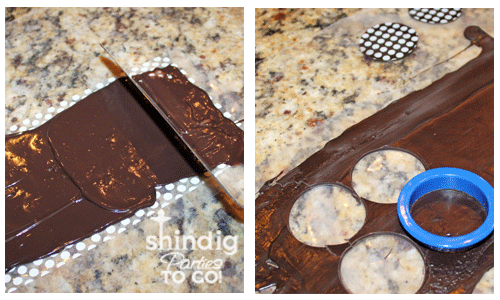
Step 7: Carefully spread the chocolate to cover all of the transfer pattern with an offset spatula or the back side of a large knife. Spread the chocolate until you have a thin, even layer. (Note: Be careful not to shift the bottom layer of chocolate against the design too much -- I made the mistake of doing that and it broke up the design pattern a little.)
Allow the chocolate to set for 5 to 7 minutes or until it's no longer glossy but not completely firm and brittle. At this point, you can cut circles of the chocolate patterns to fit on top of your chocolate covered Oreos. Use a circle cookie cutter just a little smaller than the diameter of your Oreo and press into the thin layer of firmed chocolate. Press and turn the cookie cutter until you have punched out a circle of the chocolate transfer sheet.

Step 8: Put a small dab of melted chocolate on the back side of your patterned chocolate and apply the circle to the top of your chocolate covered Oreo.

Step 9: Repeat the whole process until you've made a plate full of beautiful cookies.
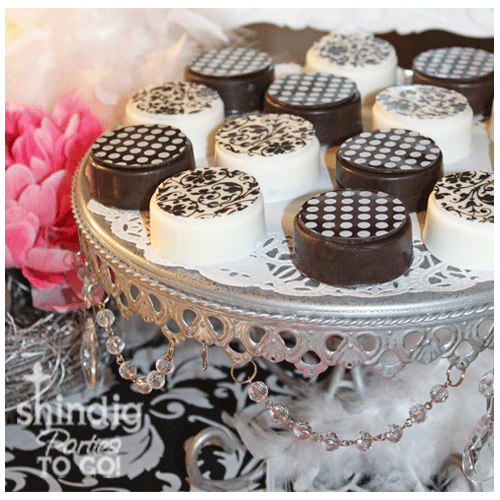
I hope you all enjoyed this tutorial. I can't wait to show off some more of the fun ideas from my daughter's upcoming party. Wish me luck this week getting it all ready on time. I think I'm going to need it!

192 comments:
Wow - great tutorial! I had no idea oreo molds existed! Your chocolate coverd oreos look beautiful! Thanks for sharing :)
Those look amazing! Thanks so much for sharing. I think I will have to try this but I'm not telling anyone how it's done! lol
Thanks for sharing!
That is so great!! Thank you for sharing!!
I'll take a dozen...that should get me through lunch time tomorrow :) (did I mention I work from home by myself)
They look FAB and kinda make me drool!
so funny Amanda that you are showing this now...I am making them on Wed for my daughter's 2nd birthday party on Thursday. I don't have a mold or the transfer sheets, but I have a PLAN! lol...yours looks FAB!
These are beautiful! I was always too cheap to by them, so now with your tutorial I can make them! Thank you for sharing with us!
I have been wanting to make these. Where did you purchase the cookie mold and transfer sheets?
WOW!! Those are beautiful . . . too beautiful to eat!! :) I will have to get some of those molds and transfers. Thanks for the tip!
~cheryl
So pretty!!
Megan
www.CutTheCraft.com
This is AMAZING! You make it look easy, but it seems I can't make a pretty dessert to save my life. Perhaps I'll have to give this one a try. Thanks for sharing.
Thank you for the tutorial. I just purchased a dozen oreos from a "known" source and could not believe how terrible the quality was. I was upset, and wished I could have done it myself. Now I can, with your help. THANK YOU for the step-by-step.
You are the BEST! I was just wondering where to find the transfer sheets! So excited! Oh, and I have that cake display from Home Goods too!
Thanks everyone!
For the links to the transfer sheets and the cookie molds, just read the top of my post. The shops are Fancy Flours and Spinning Leaf.
Amanda
Just gorgeous! I wish I could do these for my daughter's party on Saturday, but here in Phoenix, it's too hot in May to risk chocolates!
What a great (and tasty) tutorial!! I would love it if you would link this up to my party A Marvelous Mess....each week I pick one project to feature on my sidebar!! Here is the link: http://marvelouslymessy.blogspot.com/2011/05/marvelous-mess-11.html
Super cute - always wondered how those were made! Thanks for sharing.
Those look amazing! I'd love to try that for a shower I have coming up!
~Jessa
www.jessajill.blogspot.com
Oh my goodness, those are absolutely beautiful! I didn't know there was such a thing as oreo molds . . . or even chocolate transfers. Can you tell I don't get too fancy with baking? ;-) I definitely want to give this a try--they are amazing!
Rachel @ Maybe Matilda
This is a totally cool idea - I'm definitely checking out those transfer sheets. Would love if you linked this to my Craftastic party:)
Love this tutorial! Thanks for sharing!
OMG! They look so great and so does your blog. I am totally trying this out.
And you did it again! I love the look of chocolate covered oreos, and this is a great tutorial! Now, I think I’m going to have to try it myself...thanks so much!
Thanks for the tutorial. Must share with my daughter who loves to bake. Many grandchildren and party opportunities to try these out!
Great tutorial. I'll have to share with my daughter - the baker in the family. With 9 grandchildren there's always a party going on so great opportunity to try these out! Thanks!
These cookies are beautiful... Never knew there were cookie molds... Want to make these sometime for a party!
I love your blog! truly amazing. and can you just make me some of those oreos! lol, great tutorial though. they look so yummy.
kathryn
@ thedragonsfairytail.blogspot.com
amazing! u took something so ordinary and turned into something extraordinary!
These look beautiful and de-lish! Thank you for sharing this info with us! I have an upcoming baby shower and these would be perfect little treats!
I'm your newest follower!
Gorgeous! Never heard of the oreo mold before.... I may have to invest in one. Thanks for sharing.
WOW!!! These are fantastic!!! I'm a new follower fo sho! :)
Wow! They look incredible!
Jo @ SmileMonsters
Visiting from Someday Crafts. I had no idea there were chocolate transfer sheets. I just put sprinkles on my chocolate covered Oreos.
Holy smokes!! I had no idea there was a mold!! Now I want one!!
Fantastic!!
These are absolutely gorgeous! Great job, thanks for sharing the tutorial.
These look AMAZING! I'm so impressed!!
-Ashton www.somethingswanky.com
Wow, these are so amazing! I HAVE to try this, great tutorial!
WOW, these turned out amazing I am definitely going to have to try these!
-Heather @
http://craftiestthings.blogspot.com/
Those look awesome! What a great idea :)
Wow!
Hi :-) I followed your link over from Sumo's sweet Stuff's blog party. I just had to check out your fudge covered oreos.
Y-e-a-r-s ago now, soon after Nabisco (R) first put out their fudge covered Oreo's (TM), I was introduced to them. And was I ever instantly impressed and hooked! Mercy!!
WE have four sons, and due to us being in the food service industry (working for caterers, etc.
) our sons have been brought up to recognize and appreciate good food. But a package of those fudge covered Oreos was more than I wanted to spend to share with the boys. o;-p
Brian always worked two jobs. Especially around the holiday season, which is the only time Nestle was shelving the cookies originally.
I knew I had been 'had' when the boys questioned Brian about why mom had started going to bed at night with a glass of milk. o;-p Thankfully while he smirked, he explained that sometimes a warm glass of milk helps steady a tummy.
"But she pours it right before we go upstairs". "Yes, but then she reads for awhile till you guys are really asleep, right?"
Brian had caught on that I had again bought some of those fantabulous cookies and had them hid somewhere in our room.
The last couple of years Nabisco has put out the white choc. covered and the fudge mint, but I have not been able to find and thus buy the plain fudge covered ones. :-[
Gonna have to break down and make my own!
kitchen countertops without paying over the oddsIf you spend a fair amount of time in your kitchen you can really improve your quality of life by making improvements to this room through remodelling, and the best thing is that it won?t cost the earth to make your existing kitchen into your dream kitchen.
Holy cow!!! These are AMAZING!!!!!!!!! And so beautiful!
I would love it if you linked up at my weekly Friday link party if you are interested.
Thanks for the great tutorial. I am so surprised at how easy that looks!
Ashley
www.simplydesigning.blogspot.com
These are gorgeous, not to mention delicious looking! Thanks for the awesome tutorial!
Would love for you to join my linky party! :)
http://www.inspiringcreationsblog.com/2011/05/friday-favorites-linky-party.html
OMG!!! OREO MOLDS?!?! I had no idea! Thanks for the tutorial. I'm soooo excited to order one of these molds. Very pretty oreos girl!
these are gorgeous! lol who knew oreos could look so elegant!
thanks so much for the tutorial!!
They are almost to pretty to eat! This would be so cute for a little girl's "tea party".
Yummy! Yes, they do look too pretty to eat! I want some!
Gorgeous! You make it look so easy!
These turned out so beautiful! I can't wait to try these for myself. Thanks for sharing!
Katie
www.sweetrosestudio.blogspot.com
I had no idea these molds existed! Thank you so much for sharing this!!!
These beauties have been featured on C.O.M. thanks winks- jen
These look incredible! I love how pro they look with the transfer patterns on them!
Oh my...those look so yummy and beautiful!! Thank you for linking up to my party!
GORGEOUS!! I'm definitely adding this post to my favorites. I'm planning to do a milk and cookies party for my son's 1st birthday and these would be adorable, a little less frilly of course. : )
No way!! I LOVE this idea! I'll have to try it and have everyone in the fam think I've magically turned into some sort of fancy chef!
Yummy! Where does one get chocolate transfer paper?
These look amazing! I would love if you would like up to Make it for Less Mondays at http://simplycadence.blogspot.com
Hope to see you there!
Wow! I had no idea anything like this even existed! They look so professional!
Hopped over from CraftOManiac....so simple. Didn't even know those molds existed, awesome!
paula
Wow! And thanks for the link to the chocolate sheets. They are amazing!
Wow!! Those Oreos look fabulous!
These looks sooo cool!!! Wow!!!
Thanks for the tutorial. I had seen pretty oreos somewhere else and wondered how they got the cute pattern on the top.
Great tutorial. Thanks for linking up to my Marvelous Mess party!! I wanted to let you know that I featured this project on my blog!! Here is the link if you want to check it out (and grab a button!!): http://marvelouslymessy.blogspot.com/2011/05/marvelous-mess-11-features.html
How awesome is this!! My cousin is having a Bridal Shower soon and I am looking to do Food Favor's - this would be perfect. I am your newest follower - can't wait to go back and read some prior posts!
Carrie
OK my chocolate covered OREOS don't look like this! These are GORGEOUS!
those look so beautiful and professional! Nice job!
You had me at chocolate + oreos.
But these are just gorgeous to look at and I'm sure yummy to eat.
too cute to bite! love it!
Thank you so much for this tutorial!!! I can't wait to make these...they are gorgeous!
So cool! Bookmarking this for later use!
One quick idea - to make it faster, could you simply cut out circular pieces of the transfer paper, place them in the molds, and then after popping the cookie out, peel off the paper?
You've been featured at my party this week; Hookin Up with HoH #48
Congratulations! You are awesome. Stop by and grab a button if you'd like.
Allison @ House of Hepworths
Too awesome! My husband is an Oreo addict and this would be a great way to surprise him with his favorite snack. Thanks for sharing!
These are amazing! Thanks for the tutorial, I will be trying them soon.
These are so beautiful! Who knew oreos could look so fancy lol!
I'm featuring this at womenwhodoitall.blogspot.com. They are beautiful!
Jill
Beautiful!! I am visiting from Tatertots and Jello and I am a new follower!! Hope to see you around!
Have a great weekend!
Michelle
www.delicateconstruction.blogpspot.com
This does look much easier with the molds. We also like making brownie covered oreos and you can simply sprinkle powerdered sugar on the tops for a fancy design. Found you via Tidy Mom's I'm Lovin' It friday ;) Have a wonderful week.
Fondly, Roberta
http://con-tain-it.typepad.com
Wow! You make these look so easy. Thanks for sharing.
These really look amazing!!
Thanks for linking up! I shared them on my wrap up post!! http://tidymom.net/2011/cookie-recipes/ Hope you're having a great weekend!
awesome! cant wait to try this out! thank you!
These are gorgeous. Thank you so much for sharing I am going to make them for the next baby shower I host. They are so pretty you could have them at a wedding. Seriously I am in love. I found you through under the table and dreaming and I also pinned this in my pinterest files. Thanks again. Come and visit me I love new friends
tyandwhitneyulrich.blogspot.com
Those look amazing!!!
Thank you for sharing this! I have wondeed how that is done. I want to try it. It's a new interest for me. Have a great week! Sunny109
Do you think you could make these in advance and freeze them without ruining the look or taste?
I am not a fan of oreos but I really want one of these! I'd love it if you share this @ Workshop Wednesday! It would make a great addition to the party!
So beautifully done! I've done these free-form, but love the way that they come out in the mold the way you did!
Fancy Flours is one of my favorite cake/candy supply stores!
Have you ever tried cutting the transfer sheet in circles to fit directly in the mold cavities, and placing them cocoa design side up before pouring the chocolate? I do this when I make decorative square truffles and it's great because it cuts down on the extra step of having to make the topper.
Love your blog!
Jenn/Rook No. 17
These are fabulous!! I had to share them on my blog with props back to you. Thanks for sharing.
johanna xo
over @ Huggs and Kisses xo
http://huggsandkissesxo.blogspot.com/2011/05/cookies-are-for-any-occassion.html
I've highlighted this amazing tutorial on my little blog at http://wadelmat.blogspot.com/ Thanks for sharing!
Mari
Amanda - beautiful oreos - they are simply perfect and chic! Thanks so much for linking to the Sunday Showcase Party - I greatly appreciate it. I have featured this today. Enjoy the rest of your week ~ Stephanie Lynn
www.bystephanielynn.com
they came out very pretty and i love how simple it was yet looks like it took hours to make! i am so going to try this!
WOW these look so professional! I would love it if you could stop by Heck Fridays today(Thursday) and post it on our first link party!
http://www.heckfridays.blogspot.com
Hope to see you soon!!!
OMG! Fabulous, to say the least! I love this gorgeous cookies, you're such a skillful and talented lady. Wonderful! and thank you for the great tutorial, my granddaughters are going to love this! Thanks for sharing.
Hugs
FABBY
These are AWESOME!! Thanks so much for sharing! BTW...I featured them here:
http://thecreativecrate.blogspot.com/2011/05/chocolate-dipped-oreos-yum.html
Thanks again! :)
These turned out so beautifully! Thank you for sharing!
I just highlighted this project on my blog post today with a back link to your post!!! If you want to see it highlighted, go to:
http://thehomelessfinch.blogspot.com/2011/05/what-ive-been-seeing-in-blog-land.html
Thanks, Lesley
These look terrific! I need to get the oreo mold with the flat top & try the transfer sheets. I've been wanting to do that for a while, but you make it look really easy.
I just love these cute oreos - I am your newest follower:) On my blog I highlighted these and linked to your blog - hope that is okay, if not please let me know. If you want to check, here is the link: http://ideacupboard.blogspot.com/2011/05/chocolate-covered-oreos.html
Yummy!!!
I am your newest follower, and would love it if you would follow me back if you love our blog as well! :)
Stop by an add your latest & greatest to our What I Made Wednesday Linky Party...today is the last day!
Also, enter for a chance to win a homemade hair bow!!!
Alisa @ Sweet Peas and Bumblebees
sweetpeasandbb.blogspot.com
Stopping by from Tidy Mom. Those look so pretty! These would be great to put out at a party or wedding/baby shower. What a wonderful presentation they make!
LOVED this yummy tutorial! thanks for sharing! Now I wanna make some, lol
New follower too! Please feel free to stop by: Thrifty and Frugal by Debbie and Lavender Cove and on Twitter @thrftyandfrugal
Wow these are SO PRETTY! I can hardly contain my excitement from this tutorial. Great job!
Emily
Deviantly Domesticated
http://stephaniehillberry.com
Gorgeous. We make chocolate covered cookies at Christmas, but they've never looked so pretty! Off to get the molds! TFS!
Love these! Can you just use regular chocolate chopped for the transfer sheets?
These are awesome! You'll have to make some with the Triple Double Oreos when they come out!
Me again :) I wanted to invite you to share these cool oreos at These Chicks Cooked Recipe Spotlight. Have a blessed day :)
Katie
First of all, I love oreos. Best. Cookie. Ever.
Second, I'm thinking of asking you to be my wife. (I think wives should be able to have other wives, and I mean this in a completely un-polygamist kind of way.)
Third, these would knock the socks off of my friends. Great tutorial!
Warmly,
Stephanie from Deviantly Domesticated
Wow that is amazing. I have never heard of a chocolate covered Oreo mold. It would be really fun to make these.
Wow! Those are beautiful and I can't imagine anyone eating them! It does look kinda easy so maybe even I could do that!
These look delectable..bravo! This was a great tutorial! I featured you on my blog www.thriftyandchic.com.
~Alicia
Wow, too stinkin' cute! Definitely going onto my "some day" to-do list! :o)
This is dangerous material your sharing for chocolate addicts like me!
Love love love this! I shared on my blog here:
http://vrveils.blogspot.com/2011/06/food-chocolate-covered-oreos.html
You've done such a beautiful job on these Oreo cookies that anyone would be impressed. I sure am! I hope you don't mind, but I used a couple of your lovely photos and linked to your blog from my site on this page about chocolate Oreo cookie molds. One of our visitors was having some trouble making her own cookies, so I thought you would be a perfect example. Do let me know if you mind. Love your blog!
LOVE THESE! I would love for you to stop by and link up these lil treats in my Oreo 100th Happy Birthday Party! http://cafescrapper-scrapsoflife.blogspot.com/2012/02/happy-100-birthday-oreo-cake-blog-link.html
Thank you! Yummy!
Susie
You inspired me to make these for my daughters birthday party. I bought the transfter sheet at a local cake decorating supply store. They advised me to use a scrapbooking circle cutter to cut circles out of the transfer sheets and then place them in the bottom of the molds before you put the chocolate and oreos in. It worked perfectly and eliminated several steps!
Hello! How many transfer sheets did you use per mold sheet? I need to make 30 cookies. thanks!
These make great cookie pops. Forego the molds,open cookies by twisting apart, dip a small pop stick in melted chocolate and gently press stick in cream filling. After a minute, dip oreo in melted choco,tap off excess and carefully lay precut transfer sheet circle onto tacky oreo. Place pops in fridge for about 10 minutes then gently remove sheet circle. Hope someone can use this info-Works for me!
Cookies are beautiful!! Can you tell me the size cookie cutter you used?
Yum! I've also seen a site called The Secret Baker where you can get kits to make Chocolate Covered Oreos with all sorts of different designs! So cute!
Do you know anything about storing these once you make them? Can they be staked, frozen etc.?
Thanks for the awesome tutorial!
I truly like to reading your post. Thank you so much for taking the time to share such a nice information.
Yummy! Where does one get chocolate transfer paper?
Nice job, really good article mate free iPhone 5
tiestox 1910
Wow! They look incredible! Jo @ SmileMonsters
Hi, I have the same molds, and ughhh sometimes I can't get the oreos out, they are totally stuck!! I do all the instructions, I even called spinNing leaf, help, why is this happening, I have wasted a lot ...
Refrigerator Service Center in Hyderabad
feel free to contact customer service for further assistance 040 65554446, 9100055546, 9100055547
Click here
Really incredible!!!
U can also get on:
Frosting Sheets
Edible Cake Printers
Edible Ink Cartridges
online pickles in hyderabad
Study MBBS in Philippines
Web Designing company in Hyderabad
thanks for sharing this post.
whirlpool washing machine service center in hyderabad
Wow,
It's very tasty.
Thank you for sharing such a useful Information.
LG Washing Machine Service Center
LG washing machine service center in Hyderabad
Samsung washing machine service center in Hyderabad
Whirlpool washing machine service center in Hyderabad
IFB Washing machine service center in Hyderabad
thanks for sharing this post.
ifb washing machine service in hyderabad
Samsung washing machine service
Samsung Refrigerator service
Videocon washing machine service
thanks for sharing this post
samsung refrigerator service center in hyderabad
Nice blog thanks for sharing...
Nice Information, Keep sharing knowledge.
Washing Machine service
thanks for sharing this post
godrej refrigerator service center in hyderabad
Great post thanks for sharing...
Videocon Refrigerator Service center in Hyderabad
Nice Article.
Thank you for sharing Information.
Videocon Washing machine service center in Hyderabad
thanks for sharing this post
Godrej Washing Machine Service Center in Hyderabad
Great post. Thanks for sharing...
Nice Article.
Thank you for sharing Information.
Electrolux Washing machine service center in Hyderabad
air max 97
nmd
golden goose
birkin bag
kobe shoes
kyrie 3
yeezy boost 350
yeezy shoes
balenciaga sneakers
nike vapormax
Thanks for posting the good article on Chocolate Covered Oreos, I will try them soon.
Laptop repair services in Hyderabad
Very nice post, Really very interesting post. Best Fertility Clinic
Nice Post.
Thank you for sharing information.
https://www.hairinfo.in/dandruff-treatment
https://www.hairinfo.in/body-hair-transplant
https://www.hairinfo.in/female-hair-transplant
Awww super cute! We have added this tutorial with a link back to our round-up, 12 DIY amazing decorated Oreo cookie designs. I hope that is ok (let me know if not). You can check it out here if you wish, https://www.diythought.com/12-diy-amazing-decorated-oreo-cookie-designs/ Thanks!
Nice Article.
Thank you for sharing this post.
https://www.dryvrao.com/hair-transplant-hyderabad
I do think this is a great website. I stumbledupon it 😉 สมัคร Mgwin88 I may come back once again since i have book-marked it.
This is my blog. Click here.
follonicahockey"
23gt-r.net"
I will be looking forward to your next post. Thank you
webbet12.com
LG Refrigerator is the best brand refrigerator because it has most majorities in the world and also everyone using it. If we get any repair then also there is an immediate solution from LG services. This is only the most used brand refrigerator in this world. The refrigerator is one of the best home appliances. In every home refrigerator is present. They are using it regularly. In summer days the refrigerator is only the most useful product because we will cool water and also the food items will get spoiled very soon. The refrigerator gets some of the issues. To solve all the issues of the refrigerator just contact IFB Microwave Oven Service Center Pune
Suggest good information in this message, click here.
มวยไทย ระบบออนไลน์
เทคนิคแทง ไก่ชน เงินสด
With the help of washing machines, we can wash our clothes easily. By hand washing, it consumes too much of body energy because it is a difficult task. Issues may get in your washing then contact our repair center to solve your issues. Haier Washing Machine Repair Jaipur
Haier Washing Machine Repair Jaipur
All you have to do is put the clothes in the washer and select the wash mode. It automatically takes the water and starts running. If you face any issue with your washing machine then try to reach out to us by Haier Washing Machine Service Center Jaipur
Haier Washing Machine Service Center Jaipur
Nowadays, we find a glass door refrigerators. These are very essential for marketing. So, if you face any issue with your refrigerator then simply hit the website Haier Refrigerator Repair Jaipur
Haier Refrigerator Repair Jaipur
If you won’t hear the evaporator fan running, then there may be an issue with its motor. You need to replace its motor to solve your issue. For any kind of replacement, you can contact us through the link here Haier Refrigerator Service Center Jaipur .
Haier Refrigerator Service Center Jaipur
It saves us time and makes our life comfortable. Issues may get in your microwave oven then hire technicians from Siemens Microwave Oven Service Center Jaipur.
Siemens Service Center Jaipur
So, at any stage of service, if your appliances create any trouble than simply contact us through Godrej Service Center Jaipur
Godrej Service Center Jaipur
The refrigerator, a microwave oven, and an air conditioner. Later, all home appliances are very important in our daily life. Issues may get in your home appliances then try to reach out to us Godrej Toll Free Number Jaipur.
Godrej Toll Free Number Jaipur
The washing machine gives some relief to the individuals. Bachelors and employees get more benefit from the customer. So, if you face any issue with your washer then simply contact us through Godrej Washing Machine Repair Jaipur.
Godrej Washing Machine Repair Jaipur
IFB Washing Machine is such a good brand and suppose you using washing machine suddenly any type of issues raised to. If you face any issue while washing clothes then simply call best professionals from IFB Washing Machine Repair Pune branch then they send technicians to home and solve all issues.
IFB Washing Machine Repair Pune
Fruits, leafy vegetables, fish, and other perishable foodstuffs in the refrigerator. To solve any issue of your refrigerator simply hire the professional from the Samsung Refrigerator Repair Jaipur.
Samsung Refrigerator Repair Jaipur
When you face any issue with your refrigerator then it will be very difficult to solve the issue. Without wasting time, simply call the technician from the Samsung Refrigerator Service Center Jaipur
Samsung Refrigerator Service Center Jaipur
Moreover, it maintains food texture and taste. We reheat the cooked food by setting the timer. SAMSUNG Microwave Oven Service Center Jaipur
Samsung Microwave Oven Repair Jaipur
With the help of a microwave turntable, only the food will cook on all sides. If the motor gets damaged then simply contact us through.home appliance Service Center Jaipur
Issues may get in your Bosch appliances then hire a professional expert technician from our service center through.home appliance Service Center Jaipur
To solve each and every issue of the Bosch home appliances just call our toll Free number from the website.home appliance Service Center Jaipur
Generally, a noise comes when the washing machine spins. But if you are hearing loud and strange noises from it. If your machine is faulty, then make sure to take Bosch service through home appliance Service Center Jaipur
If you won’t find debris, then there might be something that got caught in the drum-like is your washing machine as removal paddles, you need to contact a technician to look out into the issue. You can take services for your Washing machine, contact us.
home appliance Service Center Jaipur
Also, inspect the condenser fan motor is working or not. But doing this is a little difficult for us. In this situation, contact the best technician through us.
home appliance Service Center Jaipur
However, before you fix the issue first pinpoint the source. So, to know the exact issue simply contact us through
home appliance Service Center Jaipur
We can prepare delicious food in it. We can bake the cookies and cakes, we can roast and boil the water. Issues may get in your microwave oven then contact us
home appliance Service Center Jaipur
Even before putting the clothes in the washer check the pockets for coins or hairpins. As these can damage both your clothes and the machine. If the mentioned reasons are not the problem than simply contact us through.home appliance Service Center Jaipur
The heat gets attach to the atmosphere outside. The heat pump will generally operates by an electric motor. Whenever your refrigerator creates any trouble then contact us.
home appliance Service Center Jaipur
We can buy the food in bulk amounts and can store it for the future. Issues may get in your refrigerator after using it for many years then simply reach out to our service center through. home appliance Service Center Jaipur
Next time when you turn on the oven the heat will catch that and will produce the sparks. If the waveguide cover is damaged then contact our service technician fromhome appliance Service Center Jaipur
When you call our customer care executives they take the details of the customer like name, phone number, residential address, the problem with the appliance. All these details will be forwarded to our particular service technicians. Contact us through
home appliance Service Center Jaipur
This, in addition, helps in retaining the nutrients and vitamins of the food. If you are having issues with your Panasonic microwave oven, then contact us through us.
home appliance Service Center Jaipur
We can make Maggie and popcorns in the microwave oven within a few seconds. Issues may get in your microwave oven then contact our service center through the link
home appliance Service Center Jaipur
Washing machines and refrigerators have specific features that are recognized only by the users. If you are having issues with your Haier home appliances you can contact us through
home appliance Service Center Jaipur
If you are facing any issue with your washing machine then contact the service center. We provide home services. We hold talented, knowledgeable and insured technicians to give commendable services. Washing machine helps every home. In today’s generation everyone need
home appliance Service Center Jaipur
Washing machine helps every home. In today’s generation everyone needs to complete their task within a short time. If you get any issue with your washing machine then contact the service center we provide all types of home appliance repair services in your area. Are you looking for safe and fast home appliance repair service on doorstephome appliance Service Center Jaipur
we offer all kinds if repair and services we have well trained technicians are experience team to solve any kind of issue then their customer care executives will take complains from the customer through the online by visiting our website home appliance Service Center Jaipur
IFB washing machine repair Ahmedabad has the most experienced technicians with a lot of years. We guarantee that our services will provide 100% satisfaction to the customer if you face the issue with you IFB washing machine then reach to us through the website home appliance Service Center Jaipur
If you are facing any issue with your refrigerator then contact the service center. We provide home services. We hold talented, knowledgeable, and insured technicians to give commendable services. We are trying to give high quality of service to the customers at a low price. home appliance Service Center Jaipur
A refrigerator is very useful in every home. We can keep water bottles fruits to keep them cool. Refrigerators also help to keep vegetables and fruits fresh and healthy too. If you face any issues with your refrigerator then contact our service. We are providing services in all locations. home appliance Service Center Jaipur
Refrigerator commonly known as a fridge. It is a machine which preserves the perishable food products at low temperature. A Refrigerator is a very useful home appliance. home appliance Service Center Jaipur
If you get any issue with your refrigerator then contact the services center. We provide services with affordable prices with discounts with customer satisfaction. home appliance Service Center Jaipur
Refrigerators are important as it saves our food. It prevent the food from the
formation of bacteria growth. A refrigerator is a very useful machine. We can keep water bottles, fruits and vegetables. home appliance Service Center Jaipur
Panasonic Washing Machine Repair Mumbai
IFB Microwave Oven Repair Pune
Godrej Refrigerator Repair Pune
Our technicians can solve any type of issue if it is major or minor.Our technicians are having 10years of experience. If you get any issue with your microwave oven then simply call us through the website. Home Appliance Service Center in Jaipur
If you get any issue with your IFB microwave oven then simply call us through the website. Our service center provides immediate repairing at your home within a short period of time. Our service center gives 30 days of warranty on repair. Home Appliance Service Center in Jaipur
If you get any issue with your Godrej microwave oven then contact the service center. After approaching our service center our technicians will reach our residential address within 4 hours. A microwave oven is also known as an electronic oven. Nowadays , everyone is having a modern kitchen in that microwave oven is a part of the kitchen appliance. Home Appliance Service Center in Jaipur
The washing machine is one of the important inventions of our daily lives. The use of a washing machine is a convenient way of washing clothes. It not only saves our time but also saves our energy. It is a stress-free way to wash our clothes Home Appliance Service Center JaipurOur technicians can solve any type of issue if it is major or minor.
A washing machine is featured with the timer and type of cycle. If we have a larger load of clothes, then we can select the larger wash cycle. In the same way, we can select a normal load for a limited load. The process of washing clothes is very easy. If you face any issue on your washing machine then contact us through the website Home Appliance Service Center Jaipur
Home Appliances Service Center solves each major and minor issues of your microwave ovens. Microwave oven can cook many kind of food items using microwave radiation. Microwave cooking is healthy as the oven retains the nutrients in the food. So, using microwave oven for cooking is very useful. As it is a huge time saver, people tend to prefer a microwave oven for cooking purpose. If you get issues with your microwave oven, contact us now. We provide the quick possible services to your microwave oven. Just contact us and get the issues solved at your doorstep with a warranty. Our services are genuine and honest. So, customers need not worry to make a call to us.
IFB Microwave Oven Service Center Pune
Godrej Refrigerator Service Center Pune
In case any type of issues raise in your Washing Machine any type of issues. Then don’t worry just call to the Whirlpool Washing Machine Service Center in Mumbai we will send our experts to solve the issues in it. They make your Washing machine as new one.
homeapplianceservicecenterinmumbai
Home Appliances Service Center is here to provide the best services to all the customers who are having issues with their washing machines. A washing machine is most useful home appliance in these days. We need not waste time for washing the clothes by hand if we have a washing machine. Operating a washing machine is so easy that even a child can also manage washing the clothes with it. A washing machine is also much useful to the old women. In case, if your washing machine is troubling you with improper functioning, then contact us. All the issues of your washing machines are solved by our professionals. So, contact us for the best services at your doorstep.
Home Appliances Service Center makes sure to solve every issue of your trouble making washing machine. A washing machine has importance in everyday life. In these days, a washing machine plays an important role in our daily life. There is a need of washing machine to everyone for washing of clothes. However, if washing machines were not invented, at that time, we would be following the old methods for washing wasting our time. For any kind of issues with your washing machine, contact us now. We repair your washing machine in the best way possible. Our professionally trained technicians can solve each and every issue of your washing machine at your doorstep.
If you are facing any issues with your microwave oven then our service technicians are available to solve your issues. Simply call us through Siemens microwave oven repair Lucknow. Our repair technicians identify the problem and solve it within a short period. Home Appliance Service Center in Jaipur
If you have faced any issue with your Godrej microwave oven then simply visit the website you can also call our customer executive.We are committed to provide the best services with qualified technicians who are provided with required equipment. Home Appliance Service Center in Jaipur
We charge a very reasonable price for all our repair and services. We are giving 24/7 hours services to the customers. We provide the best services warranty on general repair. If you face any issue with your microwave oven then visit my website. Home Appliance Service Center in Jaipur
Our technicians charge a very reasonable price for all repair and services. We are giving 100% best services to our customers and we are not charging extra charges. Home Appliance Service Center in Jaipur
We are providing repairs to all brands of microwave ovens repairs and services at customer doorstep in all locations. We are providing services from past 10 years in microwave oven services and our microwave oven is very important in every home. Home Appliance Service Center in Jaipur
We have provided services on time and we also provide for best services and best quality services. The technicians are very talented and he is very honest. He came on time and did the work. We provide multiple services under one roof. Home Appliance Service Center in Jaipur
If you have any problems with your microwave oven then contact us through the website Home Appliance Service Center JaipurOur service center at your doorstep to provide the best services to the customers. If you are interested in getting our service then you just call your service center. We are providing the 30days of warranty for our services. And also providing 90days of warranty on spare parts.
Home Appliances Service Center can solve all the issues of your microwave ovens. A microwave oven is a very essential appliance in our busy life. It plays an important role in our daily life. Every modern woman tend to prefer a microwave oven for cooking. You will never become tired if you use a microwave oven for cooking. As a microwave oven is essential, it is used by most of the people for cooking. But if you get issues with its functioning, then make sure to contact us. Our service center provides the honest and genuine services to your microwave oven. We provide a warranty on our services and spare parts. Contact us to get the best repair to your microwave oven.
Nice Post.... I must thank you for this informative news. If any user wants quick solutions regarding Packers and Movers, Call us at 9891954008 is the easiest way to call 24/7 workdays Om International Packers and Movers
its been long since i saw a post that's so educative and informational. i will make sure to share this my facebook group. you can also view contents on our websites below.
French Bulldog Puppies For Sale
French Bulldog Breeders
French Bulldog Puppies For Sale Near Me
French BulldogPuppies For adoption
French BulldogPuppies
Blue French BulldogPuppies
betflix ยิงปลา เว็บไซต์เดิมพันออนไลน์ที่มั่นคงที่สุดในตอนนี้ เราได้รวบรวมเอาเกมการเดิมพันจากทั่วโลกเอาไว้มากมาย ไม่ว่าจะเป็นเดิมพันกีฬาที่มีทั้ง ฟุตบอล มวย บาส เทนนิส เราเอาใจนักพนันบอลด้วยโปรโมชั่นดีๆมากมายและด้วยราคาค่าน้ำที่สูงที่สุด อีกทั้งเรายังได้อัพเดทระบบ ฝาก-ถอน ที่รวดเร็วและปลอดภัยยิ่งกว่าเดิม และมีความน่าเชื่อถือมากที่สุด ปลอดภัยที่สุด จ่ายจริงไม่มีเบี๊ยว เราพร้อมดูแลลูกค้าทุกท่านเป็นอย่างดีที่สุด
IFB Service Center in Hyderabad
Top IFB Service Center in Hyderabad.We are experts in repairing
IFB Washing Machine Service Center in Hyderabad,Refrigerator, Microwave Oven and service across Hyderabad and Secunderabad Don’t wait call us to book a appointment at your available time.
Bosch Service Center in Hyderabad
Top Bosch Service Center in Hyderabad.We are experts in repairing
Bosch Washing Machine Service Center in Hyderabad,Refrigerator, Microwave Oven and AC repair and service across Hyderabad.
Don’t wait call us to book a appointment at your available time.
Are you looking for a Samsung Washing Machine Service Center in kukatpally ? Don't waste the time on looking simply make a call to our service center in kukatpally? Our experts have proper knowledge in repairing the Samsung Washing Machine with genuine spare parts.
Our technicians will analyse the issue in your product and offer the best Samsung Washing Machine Service Center in kukatpally and it is one of the best and biggest trusted names in the home appliances.
Samsung Washing Machine Service Center in Madhapur
This blog was very helpful, i was searching for this content from along time, THANKS.Also, visit our website if you are searching for affordable packers and movers in Gurgaon Om international Packers and Movers Gurgaon
Good jobs sir thanks for this articles. Its very knowledgably blog. This is really a nice and informative,Awesome article, I Shared Your Post With My Friends Also.
if anyone wants packing and moving services so contact Om international packers in gurgaon Its very informative article sir, and very easy to understand.
VEGUS168S
VEGUS168S
VEGUS168S
VEGUS168S
VEGUS168S
IF YOU NEED TO RICH CICK BELOW
สมัครสมาชิก
This is amazing blog. the way you are writing is amazing. I am sharing this blog with my friends also. very appreatimg. if anyone wants packers and movers in budget price please contact.
like this replica gucci bags useful content best replica bags browse this site replica wallets
Chocolate-covered Oreos are a delicious and easy treat made by dipping Oreo cookies in melted chocolate. They can be customized with different chocolate types, sprinkles, or drizzles for added flair. Perfect for parties, gifts, or snacking, these sweet delights combine the crunch of Oreos with a smooth chocolate coating. Lawyers provide legal advice, represent clients in legal matters, and ensure justice is served according to the law.
virginia personal injury law
protective order for harassment in virginia
motorcycle accident attorney near me
Post a Comment